Certification Database - Seed Lot Registration
To access the MT Seed Potato Certification Database please login here.
In order to use the database, you will need an administrator to provide access via email. To request access, please contact your MT Seed Potato Certification Staff.
Tutorial Video - Registering a Seed Lot/Greenhouse.
Please watch the video on how to register your seed lots and/or greenhouses.
Finished with the Video?
Please navigate to other instructional videos covering the introduction and editing user information, querying and reports, and requesting health certificates.
Still have Questions?
To schedule an online training session with one of our MSU Seed Certification Staff Members, please email Potatocert@montana.edu
Registering a Seed Lot - Instructions
Here are some short instructions on how to register a seed lot.
- Open an Internet browser (Chrome, Mozilla Firefox, or Safari) and enterhttps://seedpotato.montana.edu into the address bar. Using your cursor, click on the Login icon at the top right corner of your screen and enter your credentials.

2. Click Main Menu > View Lots > Create Lots.

3. We are now at the Lot Creation page. In this first example, I will create a Russet Burbank, Nuclear seed lot with MSU as the Seed Supplier and Supplier Seed Lot Identifier. Using the appropriate dropdown icons, fill in the appropriate information. When finished, click on the + New Lot icon.

4. Now enter in the Field ID, Acreage, and Date Planted. The default county is listed according to your user profile. If this differs from the location of your seed lot, please update the County as appropriate. When finished, click Update. You are now ready to register another seed lot.

5. If you have another Russet Burbank seed lot, leave the Variety as "Russet Burbank" and simply update the Generation, Seed Supplier, andSupplier Seed Lot Identifier, as appropriate. In the example below, the generation was changed to G2, and the Seed Supplier and Supplier Seed Lot Identifier were changed to Arcadia Ag and 2019-198-RBK-1-31 respectively.

6. Repeat step 4 above. When finished click Register Lots. This will take you to the shipping tag uploading page. The Upload icon will appear at the right of your screen for newly registered seed lots that were sourced from another farm. You can optionally upload your shipping tag here. Clicking on the Register Lots will complete the registration process.

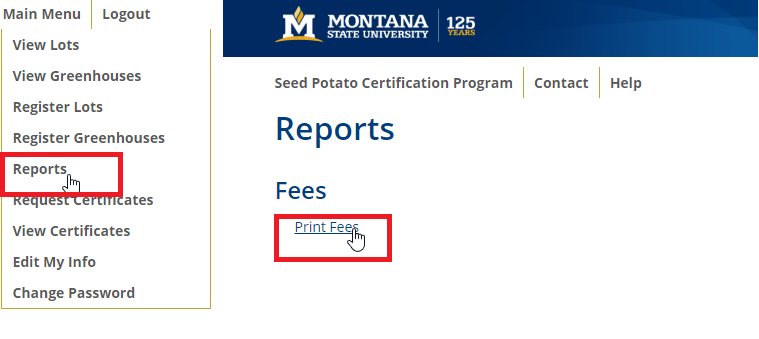
7. To view an Invoice that will sum the acreage fees for each seed lot click, Main Menu > Reports > Print Fees.

Registering a Greenhouse - Instructions
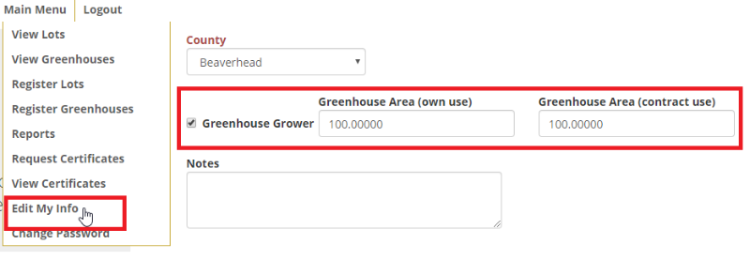
1. Using your cursor, navigate to the Main Menu dropdown list at the upper right portion of your screen and click Main Menu > Edit my Info. Scroll down and make sure the box is checked next to Greenhouse Grower. Enter the appropriate square footage being used for personal use and contract use. Scroll down to the bottom of the page and click Save.

2. Click Main Menu > View Greenhouses > Create Greenhouses.

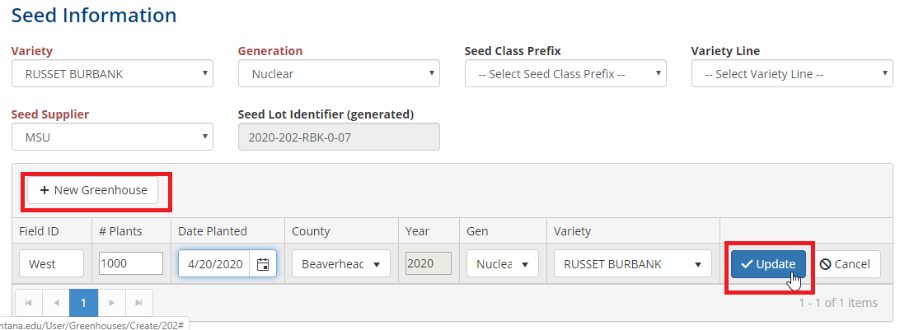
3. We are now are the Greenhouse Creation page. In this first example, I will create a Russet Burbank, Nuclear seed lot with MSU as the Seed Supplier and Supplier Seed Lot Identifier. Using the appropriate dropdown icons, fill in the appropriate information. When finished, click on the + New Lot icon. Enter the information for Greenhouse ID, #Plants , and Date Planted. When finished click Update.

4. Repeat step 3 above for additional varieties. When finished click Register Greenhouses. This will take you to the registration page. Click Register Greenhouses to finish your registration.
5. To view an Invoice that will sum the acreage fees for each seed lot click, Main Menu > Reports > Print Fees.

